How to Replace Your Cabin Filter for Cleaner Air?
Replacing your Cabin Filter is essential for maintaining clean air in your vehicle. According to automotive expert John Smith, "A clean cabin filter can significantly improve air quality and enhance comfort." This underscores the importance of knowing how to properly replace the cabin filter.
When neglected, the cabin filter can become clogged with dust and debris. This can lead to poor air quality inside your vehicle. Breathing in contaminated air can cause discomfort, especially during long drives. Regularly changing your cabin filter helps prevent these issues.
Inspect your cabin filter periodically. Look for signs of wear or dirt accumulation. Remember, replacing the filter is a simple task. However, it is sometimes overlooked. A proactive approach to your cabin filter can lead to a healthier driving environment.
Understanding the Importance of Cabin Air Filters for Vehicle Health
Cabin Air Filters play a crucial role in maintaining the air quality inside your vehicle. They help removedust, pollen, and other pollutants from the air. Over time, these filters can become clogged, reducing their effectiveness. This can lead to poor air circulation and health issues for passengers.
Regularly checking and replacing your cabin air filter is essential for vehicle health. A clean filter improves the efficiency of your HVAC system. It also ensures that you and your passengers breathe cleaner air. If you notice a musty odor or reduced airflow, it’s likely time for a change.
Tip: Check your manual for recommended replacement intervals. Many filters need changing every 12,000 to 15,000 miles or once a year.
You might forget about this minor component, but its impact is significant. A dirty filter can make allergies worse. Don’t overlook the importance of your cabin filter; it contributes to overall vehicle comfort and health.
Tip: Consider doing this maintenance during seasonal changes. It's a simple task you can do at home with basic tools. Regularly inspect the filter to catch problems early.
Identifying the Right Cabin Filter for Your Make and Model
When it comes to cabin filters, not all are created equal. Every vehicle has specific requirements based on its make and model. Understanding these specifications ensures optimal air quality. For instance, studies indicate that a clean cabin filter can improve air flow by 30%. This not only enhances comfort but also supports the vehicle's overall efficiency.
Identifying the right filter means checking your owner’s manual or consulting a reliable database. Many websites offer detailed guides based on the vehicle type. The wrong filter can lead to problems. It might not fit properly or provide adequate filtration, leading to dust and allergens in the cabin. This can be particularly troublesome for allergy sufferers.
One common mistake is waiting too long to replace the filter. According to recent surveys, approximately 40% of drivers neglect this vital maintenance task. A clogged filter reduces air quality significantly. You may notice unusual smells or decreased air flow. It's crucial to regularly inspect and replace the cabin filter to maintain a healthy interior environment.
How to Replace Your Cabin Filter for Cleaner Air?
| Make | Model | Year | Cabin Filter Part Number | Replacement Interval (miles) |
| Toyota | Camry | 2018 | 87139-0E010 | 15,000 |
| Honda | Civic | 2020 | 80292-T2A-A01 | 15,000 |
| Ford | F-150 | 2019 | CV6Z-19N619-A | 20,000 |
| Chevrolet | Malibu | 2017 | 84119268 | 30,000 |
| Nissan | Altima | 2021 | 999J1-3RG0A | 15,000 |
Tools and Materials Needed for Cabin Filter Replacement
Replacing your cabin filter is crucial for cleaner air in your vehicle. To get started, gather a few essential tools and materials. You will need a new cabin filter, a screwdriver, and possibly a pair of pliers. It's best to have a flashlight on hand, too, for better visibility.
The process isn’t too complicated, but it does require attention. Make sure to check your vehicle’s manual for the correct location of the filter. Most filters are tucked behind the glove compartment or under the dashboard. You may need to remove some screws or clips to access the filter. Be mindful; some clips are easily broken. A gentle touch is needed.
Removing the old filter can lead to dust clouds. Wear a mask if you're sensitive to allergens. Once removed, compare the new filter to the old one. Ensure the size and shape match. It’s easy to make mistakes, such as installing the filter upside down. Take a moment to reflect before closing everything up. With a little patience, you can complete this task and enjoy cleaner air while driving.
Step-by-Step Guide to Removing the Old Cabin Filter
Replacing your cabin filter can improve air quality in your car. Here’s a simple step-by-step guide to help you remove the old one.
Start by locating the cabin filter. It is often found behind the glove compartment or under the dashboard. Open the glove box and remove any contents. Look for clips or screws that may be holding it in place. This part can be tricky, so be patient.
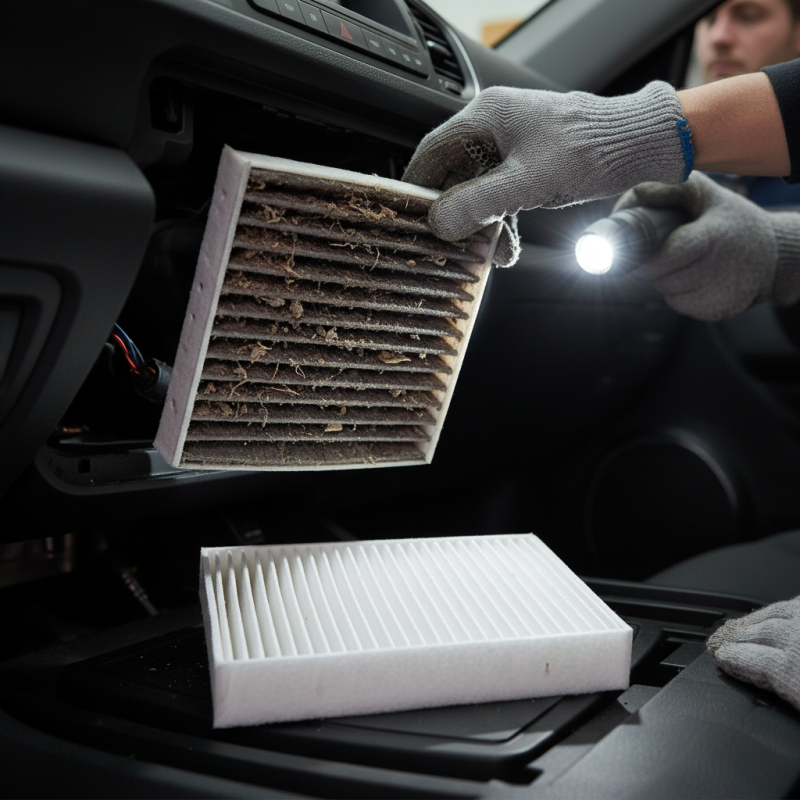
Once you have access, carefully pull out the old filter. Pay attention to how it is positioned. This will help you install the new filter correctly. If the filter is extremely dirty, it may break apart. Take your time to ensure all pieces are removed.
Tips: Wear gloves to keep your hands clean. Also, check the new filter against the old one. Make sure it fits perfectly. Clean the area where the filter sits to avoid any debris issues later.
After you install the new filter, close the glove box gently. Check your work. Sometimes, the filter may feel loose if not positioned correctly. Test your car's air system to ensure everything flows smoothly. Regular maintenance is key.
Air Quality Improvement After Cabin Filter Replacement
This chart illustrates the reduction in pollutant levels in parts per million (PPM) before and after replacing the cabin filter, showing a significant improvement in air quality within the vehicle.
Installing the New Cabin Filter and Ensuring Proper Fit
Replacing a cabin filter can enhance your car's air quality. Proper fit is crucial for optimal performance. Start by locating the filter, usually behind the glove compartment. Remove any obstacles. Gently detach the glove box by pressing in on the sides to lower it.
Once you access the filter, pull it out slowly. Check for debris or damage. Take the new filter and ensure it matches the old one in size. Pay attention to the installation direction. Some filters have an arrow indicating airflow. Align it correctly before insertion. Press firmly to secure it in place.
Reassemble the glove compartment carefully. Ensure it operates smoothly. After replacing the filter, run the air system. Listen for any odd noises. If everything sounds good, you likely did it right. It’s essential to reflect on the ease of this task. Even small mistakes, like incorrect orientation, can lead to poor air quality. Regular checks can help maintain clean air and avoid future issues.